Sunday, December 20, 2009

New Blog Layout

I am having so much fun playing with My Digital Studio, the new digital design program from Stampin' UP! I decided it was time to change my blog background, header, and the "Order Online" button to the right. The design part was so fun and easy! (Remembering how to import the html code took a little longer.) You can order MDS from my online store by clicking the button on the right. If you use a different program, like Photoshop Elements, you can still buy all the digital SU papers, stamps and elements to use with that program. Please contact me with any questions!

I would love some feedback on my new background, too!

Saturday, December 19, 2009

My Digital Studio - My First Project

I have been playing around with My Digital Studio, but I hadn't made anything to publish... until last weekend. My sister is coming to town for Christmas with her husband and son next week, so my mom and I wanted to throw a little party to introduce people to her son, Max. Really, we just wanted an excuse to get together with friends!

I can't tell you how easy it was to make this invitation. It took me less than an hour to design the invitation, settle on the wording, and send it to over 50 people via email. It couldn't get any easier than that!

Of course, I could have also had these invitations printed and mailed them through snail mail, but we were a little short on time since the party is Wednesday. I could have printed this at any number of printing locations, but I would have done it through Stampin' UP! Not only does SU have a competitive price for printing, but the colors precisely match SU's great colors if I had wanted to make this invite a hybrid and add some embellishments to it after printing.

You can order My Digital Studio through my online store. The item number is #118108. I have recently become certified in MDS, so I would also love to bring a My Digital Studio class or workshop to you and your friends. If you live in Salt Lake City or surrounding areas, contact me to set that up. If you are out of my area, I would be happy to connect you with one of my fellow demonstrators near you!
So, what do you think of this invitation?

Saturday, December 12, 2009

Trouble Viewing My Newsletter?

Recently Microsoft updated their support for HTML (the coding used on web pages) in most of their Outlook products. This change has greatly impacted the way our e-cards and e-newsletters appear when viewed in Outlook.

Fortunately, our e-newsletter and e-cards still appear as intended in all major Internet browsers (i.e., Internet Explorer, Firefox, Chrome, Safari). Therefore, while we work on key updates to address the issue with Outlook, we suggest you encourage all of your customers and downlines who use Outlook to use the link at the bottom of the e-card or e-newsletter to view the message in their web browser (see image below).

If you don't receive my monthly newsletter via email or my emails regarding the great SU promotions, please visit www.stampinwithchelsea.stampinup.net to sign up!

Friday, December 11, 2009

12 Days of Holiday Sales Begin Today!

These might be the most exciting 12 days of December with select Big Shot dies and vinyl sheets for the Big Shot on sale! The 12 Days of Holiday Sales begin today and runs through December 22.

Some of the items introduced in this sale are new colors of Décor Elements vinyl sheets. There are 18 new colors to choose from, and they make great projects when you use them with Big Shot dies. Consider pairing the Clear Décor Elements vinyl sheets with the Tulipe Bigz die to create an etched-like design on a vase. Or use the Decorative Accent Bigz dies with the Old Olive Décor Element vinyl sheets to enhance a frame. The combination of Big Shot dies and Décor Elements vinyl sheets is sure to take your creativity to a new level!

To see all the great items included in the sale and shop my online store, please visit my website www.stampinwithchelsea.stampinup.net.

Monday, August 3, 2009

Baby Boy Shower

Our friends Shelli and Kelly are having a baby boy in September. Last weekend I went to a baby shower for Shelli. As part of the gift, I gave her a set of Thank You cards. Here is what the cards look like. On the inside, I used a sentiment from Kind and Caring Thoughts that reads, "Just want you to know how much your thoughtfulness is appreciated."


Stampin' Supplies:

Stamps: Kind and Caring Thoughts (Hostess Set, Level 3) #115324
Ink: Pink Passion #101212, Pixie Pink #105212
Card Stock: Whisper White Textured #108693 (asst pack), Whisper White #199730, Night of Navy #100867, Bordering Blue #102630
1/4" Grosgrain Ribbon: Night of Navy #109036
Designer Series Patterned Paper: Bordering Blue (Retired Patterns Pack, Hostess Level 1)

This was the card I made to go with the gift. It was actually a standard card measuring 5 1/2" x 4 1/4". Apparently, my scanner didn't want to recognize the white card base. Unfortunately, I didn't notice until now, and I've already given the card away, so just imagine a white border around the Bashful Blue card stock. :)


Stampin' Supplies:
Stamps: Animal Stories #116716, Warm Words #115108
Ink: Brilliant Blue #100691, Bashful Blue #105209
Card Stock: Whisper White Textured #108693 (asst pack), Whisper White #100730, Brilliant Blue #100721, Bashful Blue #105120
Designer Series Paper: Bashful Blue (Retired from Sale-a-Bration)

Monday, July 27, 2009

Thank You! Thank You!

Can we ever have enough Thank You cards? I am always in need of thanking someone, so I find I am making cards pretty often. I happen to be pretty good at getting the cards made, but it takes me forever to get them filled out and sent. I really need to work on that part!

I made these first cards to send to the people who sent in donations for the Bike MS ride I did. The ride is 2 days and takes place mostly in Northern Utah with some short ventures into Idaho.


Stampin' Supplies:
Stamps: Flight of the Butterfly #111564
Ink: Orchid Opulence #101859, Almost Amethyst #101723, Black Stampin' Write Marker #105394
Card stock: Regal Rose #105130, Whisper White #100730, Almost Amethyst (asst) #108695
Punch: Butterfly #116629
Patterned paper (American Crafts) and brads from stash

The next set of Thank You cards I made were for my birthday. These are some of my favorite cards that I've made recently. I love the new In Colors, stamps and Designer Series Paper in the 2009-2010 Idea Book and Catalog. I think this card showcases them nicely!

Stampin' Supplies:
Stamps: On a Pedestal#113814
Ink: Rich Razzleberry # (edges), In Color Stampin' Write Markers in Dusty Durango, Crushed Curry, and Melon Mambo #116329
Card Stock: Whisper White Textured #108693 (asst pack), Rich Razzleberry #1115316, Melon Mambo #115320, Crushed Curry #115319, Whisper White #100730
Designer Series Paper: Razzleberry Lemonade #11567

Monday, July 20, 2009

Monogram Cards with Box

I have definitely been away from my blog for much too long! I have been busy wrapping up one job to transition to another, and am also finishing up classes for a certification through work. Times have been busy! I am finally finding time to get caught up on my blog, and I've been finding time to craft, too!
First, it's time to do some catch-up! Here are some card sets I made for my mom, James's mom, and my dad's girlfriend.
I made these for Mother's Day, so many of the items I used are now Retired from SU. However, I hope you will be able to use the ideas with items from the current catalog! All items used Whisper White Textured Card Stock (106529), Regal Rose Card Stock (105130), Regal Rose ink pad (105211), and the Scallop Circle Punch (109043). I also used the Big Deal Alphabet stamp set (retired) for the letters. I think the Contempo Alphabet (111570), or the Lovely Letters Alphabet (115030) stamp sets would look great on monogram cards, too!
Each set included two note cards.
I used Regal Rose card stock on the box and in many of the pictures. I also used Brocade Blue patterned paper, which was one of the Hostess Set choices from the last catalog. Although this option is no longer available, there is another Patterns Pack Designer Series Paper 3 (116234) in this catalog available as a Level 1 Hostess Set. The ribbon is Certainly Celery (109050). I used the Oval All stamp s Set (113790), the Large Oval Punch (107305) and the Scallop Oval Punch (114889) and the So Saffron Stampin' Write Marker (105114).
This card utilized the Top Note Die (113463) for the Big Shot Die-Cut Machine (113439).

In addition to items already listed, I used the Trio Flower Punch (109183).

For this card, I used the Great Friend stamp set (113792), Old Olive ink (102277) and Almost Amethyst ink (101723).

I used So Saffron card stock (105118) for the circle, So Saffron ribbon (retired) and Whisper White Satin Ribbon (114616).

These sets were fun to make and give away!

Sunday, May 31, 2009

Last Chance List!

Stampin' UP! has just announced the Last Chance List (formerly the Retired List). These are all the items that will only be available until June 30. Check out the list and then contact me to place your order on these great items that will only be available a little longer!

http://www.stampinup.com/us/documents/Retired_Lists_0609_US_alph.pdf

Thursday, May 14, 2009

Card Box with Brad Closure Tutorial

I have had several requests for a tutorial for this card box. Thanks to Sandy, a friend from the From C to Shining C messageboard for reminding me I promised to post this!

This box ended up being one of those "happy accidents." I was adapting the measurements from a smaller box to fit my needs, but my paper wasn't long enough for the box to completely close upon itself. I decided to try adding a brad and some ribbon to make a latch. This box easily fits six A2 envelopes and six 4 1/4 x 5 1/2 cards.


Begin with a piece of cardstock cut at 8 inches x 11 inches.
With the paper turned vertically, score the paper at the 1 inch and 7 inch marks. Turn the paper horizontally and score it at the 1 inch, 5 1/2 inch and 6 1/2 inch marks.

Cut along the score lines as shown, and add adhesive to the flaps.

Assemble the box as shown.


To keep the box closed, I added a brad and ribbon before embellishing the box. You can see the finished box here. If you want a box that closes completely, begin with an 8x12 piece of cardstock. In addition to the instructions for this box, you will also score the paper horizontally at the 11 inch mark.

I think these make great gifts!

Monday, May 4, 2009

My May Special

Because of the popularity of the free ink pad with orders over $50, I am going to continue this through the month of May. Simply let me know which color of Classic ink pads you would like me to include with your order! Even better, you can combine this with Stampin' UP!s great May Scrapbooking Special to get a free pack of Designer Series Paper or Textured card stock when you buy 3! Choose your ink pad to coordinate with your paper!

Friday, May 1, 2009

Scallop Envelope Die notecard

Yay! I am finally done with finals for this semester! It was pretty brutal, but I think I finished pretty well. I'm keeping my fingers crossed!

I have been creating, but I haven't been posting. I misplaced my USB adapter to download pictures from my cartridge, and I wasn't in the mood to get on the slooow computer to download straight from the camera. Yeah, I can be lazy!

I made this little notecard holder card to fit in an A2 envelope.

All items used were from Stampin' UP!
Big Shot #113439
Die: Stampin' UP! Scallop Envelope #113462
Paper: SU! Candy Lane DSP #113980, SU! Pink Pirouette #111351
Ribbon: SU! Chocolate Chip #111367
Ink: SU! Chocolate Chip #100908
Punch: SU! Word Window #105090
Stamp: SU! Sweet Little Sentiments, Hostess Set, Level 1 #113690
Brads: SU! Clear Rhinestone Brads #113144

May Stampin' UP! Promotions

Dates: May 1-31, 2009
The Scrapbooking Promotion has three exciting parts:
  1. Buy three packs of Designer Series paper (including our Specialty Designer Series paper) or 12" x 12" textured card stock, and get one FREE!
  2. Become a demonstrator for only $75 with the Scrapbooking Starter Kit.
  3. Buy a sneak peek stamp set from the 2009-2010 Idea Book & Catalog--Jumble Alphabet (set of 52; double-mounted)--at a 20 percent discount. CLICK HERE
Item # Description Regular Price Sale Price
115199 Jumble Alphabet stamp set $43.95 $35.16
CLICK HERE to purchase or join!

Sunday, April 19, 2009

Thank You Cards and Box - Oval All

Our friends Steve and Brook are having their second son in 3 weeks. We went to a BBQ tonight to celebrate. Although they didn't want anyone bringing gifts, I can't show up anyplace empty handed! I figured this was the perfect time to try out some ideas I have for my upcoming class. I will be using different papers for the class, because I want to use the papers from the Occasions Mini Catalog. James was a sport and helped me with assembling the pieces together on the cards. He did a few of the punches, too. I think he enjoys it more than he lets on... he certainly never complains when I ask him for help, and now he has started to offer help. He may not like me sharing that info, so let's keep it a secret!

Close up of box.


Top view of box.


The cards and envelopes in the box.

I included 6 cards. All the cards used the same paper, but each card was a little different.


Close up of one of the cards.

I forgot to take pictures before we left, so I took them on my Blackberry - please forgive the photos!

All materials are from Stampin' UP!

Card stock: Bashful Blue (#105209), Not Quite Navy (#101722), Whisper White (#100730)
Patterned Paper: Bashful Blue Designer Series Paper (#112151)
Stamp Set: Oval All (#113790)from the Occasions Mini Catalog
Inks: Not Quite Navy Classic Ink (#103008), Whisper White Craft Ink (#101731)
Ribbon: Bashful Blue grograin ribbon (#109029)
Punches: Large Oval (#107305), Scallop Oval (#114889)

Baby Boy Scrapbook (2)

Here are a few more pictures that went into the baby book for my new nephew Max!


I thought I had taken more pictures, but I obviously didn't because there were many more pages! I'll have to get in touch and ask my sister to take some pictures and send them to me. So... more to come!

Thursday, April 16, 2009

Baby Boy Scrapbook (Entry 1)

I know, I know, I haven't posted any new projects. James and I went to Aspen, CO to visit my sister Mel who just had a baby boy in February. I did start to work on a few things while there, but I haven't had a chance to finish anything since getting home. I came back to finals... yuck!


However, I don't think I ever ended up posting pics from the baby book I made for cute little Max! I didn't use any Stampin' UP! products on this book, because I started it before I was using SU! products and before I became a demo.

I mostly used my Cricut and paper from Die Cuts With a View from the Baby Boy stack. For the die cuts, I mostly used the New Arrival cartridge with my Cricut. I used SCAL for a lot of the fonts to add some variety.

I don't think these pages even represent half of the book. So, this is just a sneak peak! Stay tuned for more pages!

Monday, April 6, 2009

A Few More Cards...

I am in heaven!!!

I recently discovered that the Stampin' UP! colors are almost identical to some of American Crafts colors! Being that both companies are located in Utah, it is more than possible they use the same company for printing. In December (before I became a SU! demo and fell in love with their paper sets) I went to an American Crafts warehouse sale and went overboard on the great deals they had on card stock and patterned papers. Some of the paper I bought in packs... now when am I ever going to use 50 pieces of the same paper? To make cards of course!

Here are a few cards I've made using a combo of Stampin' UP! and American Crafts supplies:
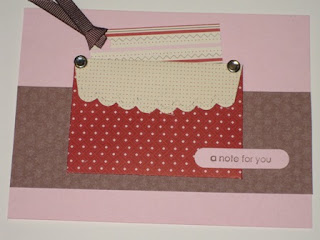
This first card uses American Crafts paper for the base and the purple layer (this is actually the backside of the striped paper). I used Whisper White CS for the stamped image base, because NOTHING works as well for stamping as Whisper White card stock! I inked the edges with Kiwi Kiss and Chocolate Chip inks. I stamped the image from Botanical Blooms (one of the Sale-a-Bration) sets in Chocolate Chip, the petals are Cameo Coral, and the leaves are Kiwi Kiss. I tied Chocolate Chip grosgrain ribbon around the stamped image. The saying is from the "Heard from the Heart" stamp set. I love the font on this stamp set! I made a pack of these cards, put them in a cello bag with envelopes, and gave them to a friend who had us over for dinner this week.
**
I used the same paper from American Crafts on the next three cards and combined it with Kiwi Kiss and Baja Breeze card stock from Stampin' UP! I am ecstatic at how well they match!!
Seriously!! Can you believe how well the colors line up?? I used the "Fifth Avenue Florals" stamp set and used the masking technique to give the look of overlapping flowers. I used Kiwi Kiss and Baja Breeze stamps for the flowers. I wrapped a black, velvet ribbon from my stash around the image. The saying didn't show up well in the photos (I tried several) but it looks great in real life! I used the "Congrats" set from Sale-a-Bration for the word "Congratulations" and stamped it in the Essential Glue Pad before covering it in Black Fine Galaxy Stampin' Glitter.
I wanted to try making some basic cards with a more masculine look. For the above card, I used Kiwi Kiss CS and ink for the "Happy Birthday". I used the Scallop Circle Punch and a Nestabilities die.

This last card was super quick to make. I cut a piece of Kiwi Kiss CS using my SU! Scallop Circle punch. I used a rub-on from my stash for the sentiment and some black ric-rac. I used Stampin' Dimensionals under the scallop to pop it off the paper.

Love You Much stamp set

Before becoming a demonstrator for SU! I attended a class that my upline, Natalie, held using the "Love You Much" stamp set. Since then, I have continued to use this set - it is so cute! All of these cards use the Candy Lane Designer Series Paper Set, another one of my favorite paper sets from SU!

For this card, I used Chocolate Chip CS for the base, Pink Pirouette CS for the stipes, Candy Lane for the polka dot paper, Riding Hood Red CS for the mat, and Whisper White CS for the stamped image. I inked the edge of the WW with Chocolate Chip ink and a sponge. I stamped the image in Chocolate Chip and used the Blender Pen and the ink-in-the-lid technique using Kiwi Kiss, Riding Hood Red and Pink Pirouette inks. I used the Masking technique to overlap the word "Love" and the birds. I punched out hearts using the Heart to Heart Punch and adhered them to the card using snail. I then used 2-way glue and Dazzling Diamonds SU! glitter.

This card also uses Chocolate Chip CS for the base, Pink Pirouette CS for the stipes and stamp mat, Candy Lane for the polka dot paper, and Whisper White CS for the stamped image. I inked the edge of the WW with Chocolate Chip ink and a sponge. I stamped the image in Chocolate Chip and used the Blender Pen and the ink-in-the-lid technique using Riding Hood Red and Pink Pirouette inks. I stamped the hearts using Riding Hood Red on Pink Pirouette and Riding Hood Red CS and used the Heart to Heart Punch to cut them out. I also added two brads... I didn't realize they were crooked until now!
By now you're getting used to this pattern: Chocolate Chip CS for the base, stamped with a Versamark Pad to get the watermark effect, Pink Pirouette CS, Candy Lane CS, Whisper White CS, image stamped in Chocolate Chip and colored with Pink Pirouette and Riding Hood Red, and punched with the Scallop Circle Punch. I used 2-way glue on the center heart and added Dazzling Diamonds Stampin' Glitter. The other hearts are stamped in Riding Hood Red and punched with the Heart to Heart Punch.


Last card! I used Riding Hood Red CS stamped with Riding Hood Red ink for the base. I used the Scallop Edge punch on the Pink Pirouette CS and used paper from the Candy Lane set for the brown. I stamped the large hear in Chocolate Chip, colored it with Riding Hood Red and Pink Pirouette using the Blender Pens, and added Dazzling Diamonds Stampin' Glitter using the 2-way glue pen. I tied Riding Hood Red striped grosgrain ribbon around the front and stamped "friend to friend" in Chocolate Chip.
Whew! I do love this stamp set and hope I've inspired you to give it a try!

Crazy for Cupcakes Stamp Set

Here are some cards I have made with the Stampin' UP! "Crazy for Cupcakes" stamp set. I love this stamp set!

This first card I made using some paper from my stash. I stamped the image in Chocolate Chip on SU Whisper White Cardstock and colored the image using a Blender Pen and the Magic Colored Pencil Technique (MCPT or Gamsol). I used the SU 2-way glue pen on the frosting and added SU Dazzling Diamonds Stampin' Glitter.

On the inside of the card, I stamped "hope your day is the sweetest ever!" which is also from this stamp set. This is such a great set for birthday cards. I made a set of them at once, so I would have cute cards on hand when needed!


I made this next card using a base of Whisper White CS and SU Bella Rose Designer Series Paper. This is one of my favorite sets of SU paper! I think I love this set because it has several different polka dot sheets and the combination of pink and brown makes my heart sing!

I stamped the image in Chocolate Chip on Whisper White CS and colored the image using Blender Pens and the ink-in-the-lid technique with Close to Cocoa, Riding Hood Red, and Pink Pirouette. I tied Chocolate Chip grosgrain ribbon around the front and used the SU Scallop Edge punch along the floral layer of paper. I think I made this card at a card demo by my upline Natalie.

This paper is only available for a few more months, so stock up now if you love it as much as I do!

Thursday, April 2, 2009

April Specials

Connect with family and friends when you make them beautiful cards and gifts using products from the Occasions Mini Catalog. From April 1-30, when you buy $40 in products from the Occasions Mini or host a workshop totaling $150 or more, you'll get one item from the "Under $10" page (p. 208) in the Spring-Summer 2009 Idea Book & Catalog--FREE!

In addition, I'm also running a special for the month of April. For every order you place through me, I'll send you a Classic or Craft inkpad in your color choice when your order totals $50 or more (before taxes, and S + H). Now is a great time to buy SU! products or to host a workshop!

Sunday, March 29, 2009

My New Background

Yay - me! Thanks to some very helpful friends on the Cricut messageboard, I've created and added my own background to my blog! It now has a little personality. Of course, it had to showcase my love for all things pink and polka-dots!

First, I went to www.thecutestblogontheblock.com. After picking one of their free backgrounds, I stumbled across the tutorials. Since I have been wanting to play around with Photoshop, I decided to create my own background. I used elements I found at www.shabbyprincess.com. They have the cutest templates on their site, and many of them are free!!

Tomorrow (maybe) I'll tackle my header.

What do you think??

Saturday, March 28, 2009

Catching Up

Well, well, well. Keeping up with a blog is going to take more time than I thought! I have been waiting to post until I had some new things to share, but I seem to have many works in progress. I need to finish something!
So I won't feel too pathetic about myself, I'm going to post some things that are a little older. I decided I just need to start somewhere, right?

This first card I made using the Don Juan cartridge, a Martha Stewart punch, and Skittles. I like the simplicity.


Here are some Halloween cards made using Wild Card

My favorite cards to make are for birthdays and thank yous. This birthday card was made using the cake image from Wild Card. I flipped another slice and welded them together in Design Studio to it would open like a card. It looked pretty flat, so I added a different paper along the "top" of the cake to give it some dimension.


This was one of the first cards I made with my Cricut. I cut the words from DoodleType, the flowers are a Martha Stewart punch, and once again I used Skittles for the flower centers.

That's it for now. I need to go make a dessert for a party tonight. I'll download some pictures of more recent projects and (hopefully) get them uploaded tomorrow!

Related Posts with Thumbnails